Imaginarium Medieval Castle Assembly Instructions Pdf May 2026
Finding direct PDF manuals for the discontinued Imaginarium Medieval Castle can be difficult as Toys "R" Us (the original retailer) no longer hosts them. However, most Imaginarium wooden castles follow a standard slot-and-tab assembly method. Assembly Overview
The assembly typically involves sliding flat wooden boards together through pre-cut slots. No tools are generally required, though adult supervision is recommended for the drawbridge mechanics. General Assembly Steps
Prepare Your Workspace: Clear a large, well-lit area. Sort all wooden panels (walls, floors) and plastic turrets by size.
Base and Walls: Slot the main castle walls into the grooves on the painted baseplate.
Towers: Slide the interlocking tower pieces together (often labeled with letters or numbers) and place them at the corners of the structure.
Drawbridge Mechanism: Thread the provided string through the drawbridge and the winding mechanism in the main gate tower.
Final Details: Add flags, ladders, and banners into their designated turret holes. Where to Find the Full Instructions
Since official digital links are often broken, you can find high-quality copies through community and resale sites:
eBay & WorthPoint: Often list the Original Paper Manuals for purchase or reference.
Replacement Parts: Sellers of Individual Replacement Sections sometimes include a copy of the instruction sheet in their listings.
YouTube Guides: Searching for "Imaginarium Wooden Castle Assembly" often yields video walk-throughs that serve as a visual instruction manual.
Pro Tip: If you have the 2-in-1 Battle Castle version, remember it is designed to split into two halves for separate play, meaning you should assemble each half independently before joining them.
Do you have the model number from the box (e.g., 5F5E249) so I can try to track down the specific part list for that version?
Imaginarium Medieval Castle Assembly: Your Complete Guide Building an Imaginarium Medieval Castle transforms a collection of wooden boards into a grand fortress for imaginative play. While these vintage Toys R Us exclusives are prized for their sturdy 2-in-1 designs and hand-painted details, finding the original manual can be a challenge.
This guide provides step-by-step assembly insights and resources to help you download or recreate the Imaginarium Medieval Castle assembly instructions PDF. Where to Download Assembly Instructions
Official digital copies from the original retailer are no longer hosted, but several reliable community resources and third-party sites maintain archives:
Instruction Archives: You can often find community-uploaded PDFs or digitized versions of the manual on sites like Strikingly.
Secondary Market Reprints: Collectors often sell high-quality black-and-white copies of the original 6-page manual on platforms like WorthPoint.
Replacement Part Listings: Sellers on eBay sometimes include a "free instructions" printout when you purchase replacement towers or wall sections. Key Components and Parts List
Before starting, ensure you have all pieces. A standard Imaginarium Medieval Battle Castle typically includes:
Two Castle Halves: A modular design that allows for one large fortress or two separate battlements.
Flat Boards with Slots: Pre-cut plywood pieces designed to slide together without tools.
Working Drawbridge: A timbered gate that lowers using a drawstring mechanism.
Accessories: Often includes up to 34 pieces such as silver and gold knights, ladders, cannons, and banners. Step-by-Step Assembly Instructions
The Imaginarium castle uses a clever slot-and-groove system, meaning no tools are required for basic construction. 1. Preparing the Base
If your set includes the painted base with a moat, lay it flat on a hard surface. This serves as the foundation for your fortress. 2. Erecting the Main Walls
Identify your wall pieces (often labeled with letters like A, E, T, etc.).
Slot Alignment: Align the grooves at the bottom of the upper walls (e.g., Piece B and C) with the grooves on the top of the lower walls (e.g., Piece E).
Connecting Walls: Tap the walls down into the grooves to lock them together.
Support Inserts: Insert smaller stabilizing pieces (like Piece S or U) into the slots on the back of the castle walls to provide rigidity. 3. Assembling the Towers
The towers are typically comprised of four identical vertical pieces that slot together to form a square.
Crenellations: Ensure the notched "battlements" are facing upward.
Turret Toppers: Once the tower body is secure, add any spire or roof elements. 4. Installing the Drawbridge
The drawbridge is the most complex mechanical part of the build.
Placement: Align the drawbridge door with the pre-cut opening in the front wall.
Threading the Cord: Thread the included string through the small holes on the drawbridge door and the corresponding holes in the castle wall above it.
Securing: Knot the ends of the string to ensure the drawbridge can be raised and lowered smoothly. Essential Assembly Tips imaginarium medieval castle assembly instructions pdf
Adult Assistance: While children can help, reviewers at Toy Portfolio note that this set requires "serious adult assembling" and significant time.
Space Consideration: Once built, the castle is quite large and does not easily disassemble to fit back in its original box. Plan a permanent spot for it.
Loose Joints: Over time, wooden slots may loosen. If the castle feels unstable, you can use a small amount of wood glue in the joints for a permanent, sturdy build. WorthPointhttps://www.worthpoint.com IMAGINARIUM MEDIEVAL CASTLE ASSEMBLY ... - WorthPoint
Finding the official PDF for the Imaginarium Medieval Castle (originally a Toys "R" Us exclusive) can be tricky as the retailer is no longer in business. Most versions of this toy are wood-based and use a "slot and groove" assembly system that requires no tools. Assembly Overview
Method: Most parts are pre-cut flat boards with slots. Pieces slide together and lock into place. Key Components: Walls: Major sections are labeled (e.g., Wall A, B, C, E).
Drawbridge: Contains moving parts that typically involve a rope or drawstring mechanism. Common Steps:
Lower Walls: Insert vertical pieces (like Piece S) into the slots on the back of primary castle walls.
Joining Sections: Align the bottom grooves of upper wall pieces with the top grooves of established base walls and tap them down to connect.
Features: The drawbridge and carts are typically added after the main structure is stable. Where to Find Full Instructions
Digitized Copies: A detailed text-based guide for the Imaginarium Castle assembly can be found on this strikinglycdn.com PDF link.
Replacement Manuals: Because this is a vintage item (circ. 2008), physical manual copies or printouts are often sold on eBay or archived on sites like WorthPoint.
Similar Models: If your set is plastic rather than wood, it may be similar to the Imaginext™ Medieval Castle, which has official instruction sheets hosted by Mattel.
Note: Ensure you have all the pre-cut "flat boards" before starting, as these slots can be fragile if forced without proper alignment. imaginarium castle products for sale | eBay
The Imaginarium Medieval Castle (Model 5F60677) can be assembled by following these steps to connect the wooden panels and towers. While an official PDF is often hard to find for this discontinued Toys "R" Us line, the assembly typically requires a Phillips head screwdriver and follows a standard modular layout. Assembly Overview
Base Setup: Start by laying out the floorboard. This is the flat wooden piece that provides the foundation for the walls.
Main Walls: Slot the large wall panels into the grooves on the base. The front wall usually features the drawbridge mechanism.
Corner Towers: Position the four towers at each corner. These usually screw directly into the side and back walls to provide structural stability.
Drawbridge Installation: Thread the string through the holes above the gate and attach it to the drawbridge door. Secure the string to the internal winch handle so it can be raised and lowered.
Final Details: Attach the plastic or wooden battlements (the notched tops of the walls) and place any interior platforms or ladders. Safety & Maintenance
Hardware Check: Ensure all screws are tight, but avoid over-tightening as the composite wood can strip easily.
Cleaning: Wipe down with a damp cloth; avoid submerging wooden pieces in water.
Introduction
The Imaginarium Medieval Castle is a popular children’s playset that blends imaginative role-play with hands-on building. This guide explains what to expect from the assembly instructions PDF, walks through the typical steps for putting the castle together, offers tips for a smooth build, and suggests ways to expand play once assembly is complete.
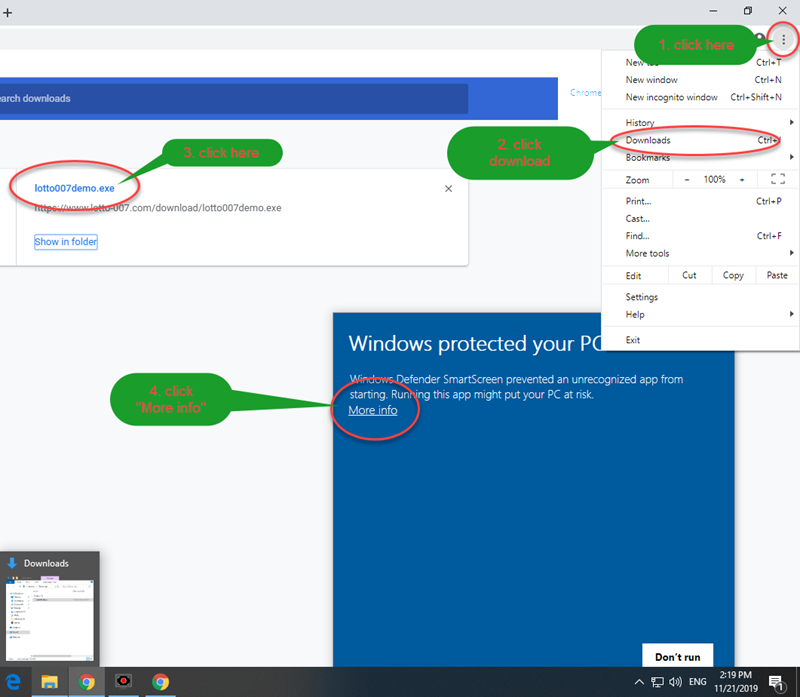
Step 1: Check the "Manualslib" and "Manuals.plus" Archives
Google is often clogged with spam sites. Instead, go directly to:
manualslib.com - Search "Imaginarium Castle."manualslib.co.uk - For European versions.
On these sites, look for "Assembly Instructions" under the "Toys & Games" category. The file is usually a 2.5 MB PDF titled Imaginarium_Medieval_Castle_Manual_RevA.pdf.
Step 3 – Build Towers as Independent Modules
Each tower consists of 4 corner posts slotted into a square base. Screw those together first, then attach the tower to the main wall.
Conclusion
Assembling the Imaginarium Medieval Castle is straightforward with a patient, organized approach. The instruction PDF provides essential diagrams and part lists — prepare your workspace, follow steps in order, and the castle will be ready for many hours of imaginative play.
Related search suggestions sent.
3. Voice-Activated Navigation
Building a castle is a two-handed job. Stopping to wipe hands and swipe a phone screen is annoying.
- How it works: The user can say commands like "Next Step," "Go Back," or "Zoom in on the Drawbridge." This allows for a seamless workflow without touching the screen.
Part 5: Troubleshooting Common Assembly Errors (From Real User Reports)
| Symptom | Likely Cause (per original PDF) | Solution |
|--------|--------------------------------|----------|
| Towers wobble | You skipped the small L-brackets (step 4, diagram C). | Disassemble tower top. Add brackets. |
| Drawbridge won’t stay up | String is too long (PDF specifies 14cm from knot to pulley). | Retie with shorter loop. |
| Roof cones don’t fit | Cones are left/right specific. | Swap cones between towers. |
| Wall gaps appear | Screws over-tightened. | Loosen by 1/4 turn. |
| Missing sticker sheet | PDF includes a printable black-and-white backup. | Photocopy the last page of the PDF and color manually. |
🧾 Tech Specs (PDF Features)
- Page count: 34 pages
- Format: Printable letter/A4 + spreads for tablet viewing
- Interactive elements: Clickable checklists, QR audio links, hyperlinked “troubleshooting” section
- Accessibility: High-contrast diagrams, dyslexia-friendly font for instructions
. This text is designed to help you organize your kingdom and ensure your fortress stands strong against any imaginary siege. Preparation Checklist Clear a Workspace
: Find a flat surface with plenty of room to spread out the wooden panels. Inventory Check
: Ensure you have all the wall segments, tower caps, floor plates, and the working drawbridge.
: Lay out all screws and the hex key (Allen wrench) provided in the box. Assembly Steps 1. Construct the Base and Main Walls Lay the large green baseplate on the floor.
Identify the front wall panel (the one with the arched doorway). Slot it into the front grooves of the baseplate.
Attach the two side walls by aligning the pre-drilled holes with the front wall. Use the long screws to secure them, but don't tighten them fully until the whole frame is aligned. 2. Erect the Corner Towers
The castle features four cylindrical or square corner towers. Slide the tower walls into the vertical slots at each corner of the main structure. Finding direct PDF manuals for the discontinued Imaginarium
Place the circular floor inserts inside each tower. These provide stability and act as "sentry posts" for your knights. 3. Install the Drawbridge
Locate the wooden drawbridge door and the two lengths of string/cord.
Thread the strings through the small holes above the main gate and tie them to the eyelets on the drawbridge door.
Test the hand-crank (usually located on the side of the front wall) to ensure the bridge raises and lowers smoothly. 4. Add the Upper Battlements and Floor
Place the large rectangular floor panel into the center of the castle. This creates the inner courtyard and the second-story walkway.
Snap the crenelated (notched) "stone" railings onto the tops of the walls to create the classic medieval look. 5. Finishing Touches Place the red pointed roofs onto the corner towers.
Go around the entire structure with your hex key and tighten all screws until the castle is sturdy. Attach the flags to the tower peaks. Safety & Care Tighten Regularly
: Wooden toys can expand and contract; check the screws once a month to ensure the castle remains stable.
: Wipe with a damp cloth and mild soap. Do not soak the wood. : Recommended for ages 3+ due to small parts and screws. Your fortress is now complete!
Whether you're defending against dragons or hosting a royal banquet, your Imaginarium Castle is ready for duty. parts list for a specific model number?
Title: The Keep of Unspoken Hours
Logline: A disgraced architect, hired to draft assembly instructions for a luxury “build-your-own-castle” kit, discovers that the customer’s edits are not design flaws—but warnings from a version of himself trapped inside the paper model.
Part One: The Commission
Theodor Vance had once designed bridges that kissed the sky. Now, at fifty-two, he drafted exploded views of plastic drawbridges for the Imaginarium toy company. His specialty was the Medieval Castle Deluxe Kit—a 4,000-piece behemoth of die-cut cardboard, faux-stone resin, and brittle turrets.
His new task, however, was different.
“A purely digital commission,” his boss had said, sliding a black USB drive across the desk. “A client wants custom assembly instructions. PDF only. No physical model. And Theo? He paid triple. He asked for you by name.”
The client’s name was V. Castell. The email read:
Mr. Vance, I possess the complete Imaginarium Medieval Castle kit, still sealed. However, the original instructions are… insufficient. I need you to draft a new set. A truthful set. Begin with Step Zero. Do not skip the cellars.
Theo laughed. Truthful instructions for a cardboard castle? But work was work.
He opened the PDF template and began.
Step Zero: Before assembling the curtain wall, lay the foundation stones with the painted side DOWN. The rough side must face the interior. (This is not a defect. It is the first lesson.)
He didn’t know why he wrote that. It just felt… correct.
Part Two: The Ghost in the Margins
Over the next week, the instructions grew strange.
Step 7: The great hall’s central pillar should be glued at a 3-degree tilt toward the east window. Do not correct this. A straight pillar will collapse by page 14.
Theo had never written such a thing. He checked his keyboard. No typos. He deleted the line. The next morning, it was back—in a different font. A thinner, older font, like ink bleeding from a quill.
On the third night, he found a handwritten note in the PDF’s metadata. A single line:
“I am the architect who built himself inside. Follow my corrections, or you will join me.”
Theo’s hands went cold. He traced the USB’s origin. The shipping address was a P.O. box in a town that had been demolished for a highway in 1998.
He called the client’s number. A man answered, but his voice sounded hollow, as if speaking from the bottom of a stone well.
“Did you reach the cellars yet?” V. Castell asked.
“Who is this?”
“Read Step 41,” the voice said. Then a clatter—like a portcullis dropping. The line went dead.
Part Three: The Castle’s Truth
Theo opened Step 41. It was blank. But as he stared, words etched themselves into the screen:
Step 41: The dungeon is not for prisoners. It is for the architect who refuses to admit the castle has a soul. Look at the central keep. Count the arrow slits. There are fourteen. There should be thirteen. One slit looks inward. It is an eye. manualslib
Theo zoomed into the PDF’s original 3D renders. He had built this model a hundred times. But now he saw it: a single, narrow window on the inner wall of the keep, staring straight at the builder’s position.
He printed the instructions. All 84 pages. Then he did something he had never done: he assembled the castle.
Not as a designer. As a believer.
He followed the ghost’s corrections. He tilted the pillar. He turned the foundation stones rough-side in. He left the east tower roofless (“to let the moonlight correct the geometry”).
At 3:17 a.m., he inserted the final piece—a tiny cardboard flag with a black eagle. The castle shuddered. The resin drawbridge lowered by itself. And from the miniature great hall, a voice emerged. Not electronic. Not imagined. Real.
“Thank you,” whispered the man inside. “I’ve been writing those instructions for thirty years. No one ever built me.”
Theo looked through the castle’s front gate. A miniature figure stood in the courtyard—a man in architect’s spectacles, no taller than his thumb, made of compressed paper and dried glue. His face was Theo’s face. Younger. Desperate.
“You’re the original designer,” Theo breathed.
“I am the one who tested the kit alone, in a locked room, for six months,” the tiny man said. “I found the door that shouldn’t exist. I stepped through. The castle became my cell. The instructions became my only voice. You edited them, Theo. You changed them. That means you’re the first to hear me clearly.”
Part Four: The Final Step
The PDF flickered. A new step appeared at the very end:
Step 85 (Final): To release the architect, the builder must take his place. Or—tear down the west wall. Not the real wall. The one in the instructions. Delete page 37.
Theo opened page 37. It was the cross-section of the west wall’s inner falsework. He highlighted it. Pressed delete.
In the room, the cardboard castle groaned. The miniature Theo stumbled, then straightened. The arrow-slit eye on the keep cracked. A thin light poured out.
“You chose,” the tiny man said. “Not my replacement. My door.”
The castle collapsed into a neat pile of flat sheets. The voice faded. But on Theo’s desk, now free of the model, lay a single new object: a brass key, warm to the touch, stamped with the word IMAGINARIUM.
The USB drive ejected itself. The PDF vanished from his screen—except for a final line, saved as a ghost file:
“Instructions are just promises. A castle is a question. You answered it. Now go build the bridge you were meant to.”
Theo smiled. He picked up the key. For the first time in a decade, he knew exactly what to draft next.
End of PDF. (Print only if you are ready to believe the walls.)
Imaginarium Medieval Castle is a vintage wooden playset formerly sold exclusively at Toys "R" Us
. Because the brand was part of the now-closed retailer, finding a direct "official" PDF can be difficult.
Below is a guide to the assembly process based on the design of the most common "Stonebriar" and "2-in-1 Battle Castle" models. Common Components Checklist Most Imaginarium castle sets include: Wooden Panels:
Screen-printed walls (often with "stone" graphics) and floor pieces.
Four corner lookout towers (some models require these to be screwed together). Mechanical Parts:
A drawbridge and gate that function via a spool and string system. Accessories:
Figures (knights, horses), siege towers, battering rams, and ladders. General Assembly Steps
While specific bolt patterns vary, the logic for these large wooden playsets follows a standard sequence: Base Setup:
Lay out the painted base mat or moat map to define the footprint. Corner Towers:
Connect the tower walls first. If your model uses screws, ensure the "arrow slits" face outward before tightening. Wall Insertion:
Slot the main castle walls between the towers. In newer "snap-together" versions, these panels may lock without tools; older versions use screws. Drawbridge & Gate:
Thread the string through the gate arch and attach it to the internal spool. This is often the most time-consuming step and may require manual knotting. Finishing Touches:
Attach banners and flags to the turret tops and place ladders against the internal ledges. Resources for Missing Manuals
If you have a different "medieval" branded castle, you can often substitute these high-quality instruction PDFs for similar builds:
Part A, B, C... The Language of Wood
The PDF separates the castle into three logical zones:
- Zone 1 (Pages 1-2): The Base Platform & Dungeon. This is the most critical step. The large floorboard has grooves that must face upward. If you install the base upside down, the towers will wobble for eternity.
- Zone 2 (Pages 3-4): The Main Keep & Ramp. This section includes the signature red drawbridge. Pro tip from the PDF: The string for the drawbridge goes through the hole before you tie the knot. Do not skip the "threading" diagram.
- Zone 3 (Pages 5-6): The Towers & Battlements. This is where kids want to help. The PDF shows a special "hammer block" (a piece of scrap wood) to use when tapping dowels with a real hammer. Use it, or you will split the wood.