Como Instalar Corel Draw 2019 Crack Fixedeado Fix
The BCD Store file is usually located in the Boot folder of a Windows 7/8.1/10 OS's System Reserved partition; which in many cases will not even have a drive letter assigned to it. So if you really want to see where these system files are located, you'll first need to go into Disk Management and give that partition a drive letter. (Note: Some OS distributions, such as the 'Embedded Standard' editions, do not have a separate System Reserved partition.) Apart from possibly needing to add a drive letter, all system files are by default hidden from view, so you'll also need to change the Folder Settings to show hidden system files. But, since the BCD file is kept open by the OS, you wouldn't be able to open it to look at it anyway! However, you can use the BCDEDIT program to make a backup copy of the BCD file which you can then open with a hex editor (to see everything) or even NOTEPAD (to see all the readable characters). [Contents of a real BCD file are linked below.]
Como Instalar Corel Draw 2019 Crack Fixedeado Fix
If you enter "bcdedit" at a simple Command Prompt window, you'll probably see:
The boot configuration data store could not be opened. Access is denied. |
Because you need Administrator privileges to access the BCD file with BCDEDIT. So, be sure to run the Command Prompt ![]() using a RIGHT-CLICK and selecting:
using a RIGHT-CLICK and selecting: ![]() ("Run as administrator").
("Run as administrator").
The following is what you would typically see when entering the command bcdedit all by itself:
C:\>bcdedit

Windows Boot Manager
--------------------
identifier              {bootmgr}
device                  partition=\Device\HarddiskVolume1
description             Windows Boot Manager
locale                  en-US
inherit                 {globalsettings}
default                 {current}
resumeobject            {ad68f292-2870-11e3-9c80-856fbacd7f33}
displayorder            {current}
toolsdisplayorder       {memdiag}
timeout                 30

Windows Boot Loader
-------------------
identifier              {current}
device                  partition=C:
path                    \Windows\system32\winload.exe
description             Windows 7
locale                  en-US
inherit                 {bootloadersettings}
recoverysequence        {ad68f294-2870-11e3-9c80-856fbacd7f33}
recoveryenabled         Yes
osdevice                partition=C:
systemroot              \Windows
resumeobject            {ad68f292-2870-11e3-9c80-856fbacd7f33}
nx OptIn |
Note that the Boot Manager program (bootmgr) is often located in a volume without a drive letter, such as in this example, but it could have one. If there were only one partition on the drive, then it would appear in the C: partition.
The following is a dump of a Windows™ 7/8 (or Vista) Administrator console (Command Prompt window) after entering "help bcdedit" ("bcdedit /?" will give the same):
BCDEDIT - Boot Configuration Data Store Editor

The Bcdedit.exe command-line tool modifies the boot configuration data store.
The boot configuration data store contains boot configuration parameters and
controls how the operating system is booted. These parameters were previously
in the Boot.ini file (in BIOS-based operating systems) or in the nonvolatile
RAM entries (in Extensible Firmware Interface-based operating systems). You can
use Bcdedit.exe to add, delete, edit, and append entries in the boot
configuration data store.

For detailed command and option information, type bcdedit.exe /? <command>. For
example, to display detailed information about the /createstore command, type:

     bcdedit.exe /? /createstore

For an alphabetical list of topics in this help file, run "bcdedit /? TOPICS".

Commands that operate on a store
================================
/createstore    Creates a new and empty boot configuration data store.
/export         Exports the contents of the system store to a file. This file
                can be used later to restore the state of the system store.
/import         Restores the state of the system store using a backup file
                created with the /export command.

Commands that operate on entries in a store
===========================================
/copy           Makes copies of entries in the store.
/create         Creates new entries in the store.
/delete         Deletes entries from the store.

Run bcdedit /? ID for information about identifiers used by these commands.

Commands that operate on entry options
======================================
/deletevalue    Deletes entry options from the store.
/set            Sets entry option values in the store.

Run bcdedit /? TYPES for a list of datatypes used by these commands.
Run bcdedit /? FORMATS for a list of valid data formats.

Commands that control output
============================
/enum           Lists entries in the store.
/v              Command-line option that displays entry identifiers in full,
                rather than using names for well-known identifiers.
                Use /v by itself as a command to display entry identifiers
                in full for the ACTIVE type.

Running "bcdedit" by itself is equivalent to running "bcdedit /enum ACTIVE".

Commands that control the boot manager
======================================
/bootsequence   Sets the one-time boot sequence for the boot manager.
/default        Sets the default entry that the boot manager will use.
/displayorder   Sets the order in which the boot manager displays the
                multiboot menu.
/timeout        Sets the boot manager time-out value.
/toolsdisplayorder  Sets the order in which the boot manager displays
                    the tools menu.

Commands that control Emergency Management Services for a boot application
==========================================================================
/bootems        Enables or disables Emergency Management Services
                for a boot application.
/ems            Enables or disables Emergency Management Services for an
                operating system entry.
/emssettings    Sets the global Emergency Management Services parameters.

Command that control debugging
==============================
/bootdebug      Enables or disables boot debugging for a boot application.
/dbgsettings    Sets the global debugger parameters.
/debug          Enables or disables kernel debugging for an operating system
entry. |
Note: What you see above is exactly how a Vista/Win7/8 display appears; and, yes, the word "Command" in the last heading was spelled wrong by Microsoft, it should be plural (Commands) just like all the others. And if there really was only one, then the word "control" should have had an 's' after it! This was still true for a Windows 7 SP1 install we examined, and even Windows 8.1. Is this a case of "If it ain't broke, don't fix it!"? Apparently, the cost of qualifying a revised program outweighs this grammatical error.
And even though Windows™ 10 added six new commands (shown in white below), they doubled the same grammatical error (shown in red). Now it's incorrect for both of the last two command types:
Como Instalar Corel Draw 2019 Crack Fixedeado Fix
Instalando o CorelDRAW 2019 Crackeado: Um Guia Passo a Passo
Olá! Se você está procurando por uma forma de instalar o CorelDRAW 2019 crackeado, você veio ao lugar certo! Neste post, vamos fornecer um guia detalhado sobre como instalar o software de design gráfico popular sem gastar dinheiro.
Observação importante: Antes de prosseguir, é importante notar que o uso de software crackeado pode ser ilegal em alguns países e pode violar os termos de uso do software. Além disso, o uso de software crackeado pode expor seu computador a riscos de segurança. Se você tiver condições financeiras, é recomendável adquirir o software original.
Requisitos do sistema:
- Sistema operacional: Windows 10 (64 bits) ou superior
- Processador: Intel Core i5 ou AMD equivalente
- Memória RAM: 8 GB ou mais
- Espaço em disco: 3,5 GB ou mais
Passo a passo para instalar o CorelDRAW 2019 crackeado:
- Baixe o arquivo de instalação: Você pode baixar o arquivo de instalação do CorelDRAW 2019 a partir de sites de terceiros (não oficiais). Certifique-se de que o arquivo seja seguro e confiável.
- Extraia o arquivo: Extraia o arquivo zip ou rar que você baixou. Você precisará de um software de extração de arquivos, como o WinRAR ou o 7-Zip.
- Execute o instalador: Execute o arquivo de instalação (setup.exe) e siga as instruções do instalador.
- Selecione o tipo de instalação: Selecione o tipo de instalação que você deseja (por exemplo, "Instalação completa" ou "Instalação personalizada").
- Aceite os termos de uso: Aceite os termos de uso do software (mesmo que você não concorde com eles).
- Insira a chave de ativação: Quando solicitado, insira a chave de ativação crackeada que você baixou (ou que foi fornecida junto com o arquivo de instalação).
- Conclua a instalação: Conclua a instalação e espere até que o processo seja concluído.
Crackeando o software:
- Baixe o arquivo de crack: Baixe o arquivo de crack (patch) que foi criado para desativar a proteção contra cópias do software.
- Execute o arquivo de crack: Execute o arquivo de crack (patch.exe) e siga as instruções.
- Aplique o patch: Aplique o patch ao software para desativar a proteção contra cópias.
Verificando se o software está funcionando:
- Execute o CorelDRAW 2019: Execute o CorelDRAW 2019 e verifique se o software está funcionando corretamente.
- Verifique a versão: Verifique a versão do software para garantir que seja a versão 2019.
Conclusão:
Parabéns! Você instalou com sucesso o CorelDRAW 2019 crackeado. Lembre-se de que o uso de software crackeado pode ter riscos de segurança e pode violar os termos de uso do software. Se você tiver condições financeiras, é recomendável adquirir o software original.
Lembre-se: Este post é apenas para fins educacionais e não incentiva o uso de software crackeado. O uso de software crackeado é por sua própria conta e risco.
Espero que este guia tenha sido útil! Se você tiver alguma dúvida ou precisar de mais ajuda, basta perguntar.
The glowing blue progress bar on Julian's screen had been stuck at 99% for what felt like an eternity. It was 2:00 AM, and the deadline for the local bakery’s new logo was less than eight hours away. His old laptop hummed like a jet engine, struggling under the weight of a dozen open browser tabs, all variations of the same desperate search: "como instalar corel draw 2019 crackeado fix."
Julian wasn't a thief by nature, but he was a student whose bank account currently held the price of a ham sandwich and a bus ticket. The official subscription was a luxury he couldn't afford, yet the industry-standard software was a requirement he couldn't escape.
He clicked on a link from a forum buried on page six of the search results. The site was a chaotic mess of flashing "Download Now" buttons and suspicious pop-ups. One specific thread, titled simply "FIX 2019 - NO HANGS," caught his eye. A user named VectorGhost had posted a set of instructions that looked more like a ritual than a software installation:
The Severing: Disable the internet. "Don't let the software talk to its parents," the post warned.
The Shield: Disable the antivirus. "It will think the 'medicamento' is a virus. It is not. It is the cure."
The Substitution: Copy the PASMUTILITY.dll from the "Crack" folder and paste it into the heart of the Program Files, overwriting the original.
Julian followed the steps with trembling fingers. He felt like a digital locksmith picking a door he knew he shouldn't be opening. He disconnected his Wi-Fi, silenced his firewall, and moved the mysterious .dll file into place.
He double-clicked the green balloon icon. The splash screen appeared—a vibrant burst of color—and then... it vanished. "Come on, come on," he whispered.
He tried again. This time, a window popped up in broken English: “Illegal software detected. This product will now be disabled.”
The "fix" had failed. The "VectorGhost" solution was likely a year old, and the software had grown smarter since then. Julian sat back, the blue light of the monitor reflecting in his tired eyes. He looked at the clock: 3:15 AM.
In that moment of quiet defeat, he realized that the "fix" wasn't a file or a cracked code. It was the realization that he was spending more time fighting the software than creating the art. He closed the tabs, deleted the suspicious folders, and downloaded a free, open-source vector program instead. como instalar corel draw 2019 crackeado fix
It wasn't Corel, and the interface felt like learning a new language, but as the sun began to rise, Julian wasn't a pirate anymore—he was just a designer, finally getting to work.
Para instalar o CorelDRAW 2019 de forma segura e funcional, a recomendação oficial é utilizar o instalador original da
. O uso de versões "crackeadas" ou modificadas pode comprometer a segurança do seu computador com malwares e causar instabilidade no sistema.
Aqui estão os passos recomendados para uma instalação correta e os requisitos necessários: Passos para Instalação (Versão Oficial) Preparação
: Feche todos os aplicativos abertos e desative temporariamente programas de detecção de vírus para evitar conflitos durante a instalação.
: Baixe o instalador através do link fornecido na sua confirmação de compra ou utilize o portal de suporte da Corel Execução : Execute o arquivo baixado (geralmente CorelDRAWInstaller.exe ). Aceite o Contrato de Licença de Usuário Final. Configuração
: Escolha entre "Instalação Típica" (recomendada para a maioria dos usuários) ou "Instalação Personalizada" para selecionar ferramentas específicas. Ativação
: Insira seu nome e o número de série oficial fornecido na compra. Conclua o processo seguindo as instruções na tela. Corel Knowledge Base Requisitos Mínimos do Sistema (Windows)
Para garantir que o software funcione sem travamentos, seu PC deve atender ao seguinte:
Installing CorelDRAW 2019 Cracked Version: A Step-by-Step Guide
Disclaimer: Before proceeding, please note that using cracked software can pose security risks and may be against the terms of service of the software provider. CorelDRAW 2019 is a powerful graphic design software that offers a free trial, and purchasing a legitimate copy supports the developers.
That being said, if you're looking to install a cracked version of CorelDRAW 2019, here's a step-by-step guide:
Passo 2: Instale o CorelDRAW 2019
- Execute o instalador: Abra o arquivo de instalação e siga as instruções na tela. Aceite os termos de licença (embora você não tenha realmente concordado com eles).
- Escolha a opção de instalação: Selecione a opção de instalação que melhor se adequa às suas necessidades.
Paso 3: Instalación
-
Ejecutar el Instalador: Abra la carpeta donde extrajo los archivos y ejecute el instalador.
-
Seguir las Instrucciones: Siga las instrucciones del asistente de instalación. Es posible que necesite introducir una clave de serie o realizar otras acciones específicas según la versión crackeada.
Instalando o CorelDRAW 2019
-
Desative o Antivírus: Antes de começar a instalação, é recomendável desativar seu antivírus temporariamente, pois esses programas podem bloquear o processo de instalação.
-
Extraia os Arquivos: Se o instalador estiver em formato ZIP ou RAR, extraia os arquivos para uma pasta no seu computador.
-
Execute o Instalador: Abra a pasta e execute o arquivo de instalação. Siga as instruções na tela para iniciar a instalação.
-
Selecione as Opções de Instalação: Durante a instalação, você será solicitado a selecionar as opções de instalação, como o local de instalação e os componentes a serem instalados. Você pode personalizar essas opções de acordo com suas necessidades.
-
Complete a Instalação: Conclua o processo de instalação seguindo as instruções na tela. Isso pode levar alguns minutos.
Passo 3: Aplique o Crack
- Baixe o arquivo de crack: Encontre e baixe o arquivo de crack correspondente ao CorelDRAW 2019.
- Extraia o arquivo: Use um software de extração como o WinRAR para extrair o arquivo de crack.
- Copie os arquivos de crack: Copie os arquivos extraídos para o diretório de instalação do CorelDRAW 2019. Você geralmente encontrará este diretório em
C:\Program Files\Corel\CorelDRAW 2019.
Instalando o CorelDRAW 2019 Legitimamente
-
Compra e Download: Primeiramente, você precisará comprar o CorelDRAW 2019 diretamente da Corel ou de um revendedor autorizado. Após a compra, você receberá um link de download ou um código de ativação.
-
Requisitos de Sistema: Certifique-se de que seu computador atende aos requisitos de sistema do CorelDRAW 2019. Instalando o CorelDRAW 2019 Crackeado: Um Guia Passo
-
Instalação:
- Baixe o instalador do site oficial ou insira o DVD de instalação se você o adquiriu em mídia física.
- Execute o instalador e siga as instruções na tela. Você precisará concordar com os termos de licença e escolher o tipo de instalação.
- Durante a instalação, você será solicitado a ativar o produto online ou por telefone. Isso é necessário para o uso contínuo do software.
-
Ativação: Para ativar o CorelDRAW 2019, você precisará de uma conexão à internet. O processo de ativação vincula o software à sua máquina e permite o uso completo do produto.
Paso 2: Preparación para la Instalación
-
Desactivar el Antivirus: Desactive temporalmente su software antivirus para evitar interferencias durante la instalación.
-
Extraer el Archivo: Si el archivo está comprimido, extraiga su contenido en una carpeta específica.
Passo 5: Ative o Software
- Patches adicionais: Em alguns casos, pode ser necessário aplicar patches adicionais para evitar que o software seja detectado como não licenciado.
Conclusão:
Embora este guia tenha fornecido instruções sobre como instalar o CorelDRAW 2019 crackeado, é altamente recomendável adquirir uma licença legítima do software. O uso de software legítimo não só evita riscos legais, mas também garante acesso a atualizações, suporte técnico e a consciência tranquila. Se você é um profissional de design gráfico ou apenas um entusiasta, o investimento em software legítimo é uma escolha sensata.
The Graphic Designer's Dilemma
Alex had always been passionate about graphic design. From a young age, he found solace in creating art and logos, dreaming of one day launching his own design studio. As he honed his skills, he realized the need for powerful software that could help him bring his visions to life. CorelDRAW, with its robust features and user-friendly interface, quickly became his go-to tool.
However, Alex was a student on a tight budget. He had heard about a way to get CorelDRAW 2019 for free, through a "crackeado fix" method. Intrigued by the possibility of accessing the software without the hefty price tag, he began to research how to install CorelDRAW 2019 using such a method.
His search led him down a rabbit hole of forums and YouTube tutorials, each promising a way to bypass the software's licensing. But as he delved deeper, Alex encountered a myriad of issues. Some tutorials were outdated, others contained malware, and a few led to dead ends with no solution.
Frustrated and worried about the risks, Alex decided to take a step back. He realized that using pirated software not only posed legal risks but also jeopardized his computer's security and potentially his future as a designer.
Seeking a legitimate solution, Alex discovered that CorelDRAW offered a free trial, allowing him to use the software for a limited time. This was a perfect opportunity for him to test the waters, so to speak. He also learned about various discounts and promotions that Corel offered for students and beginners.
Encouraged by his new approach, Alex decided to invest in a legitimate copy of CorelDRAW 2019 once his trial period ended. He followed the official installation guide and was impressed by how straightforward the process was. The software was up and running in no time, and he could finally explore its full potential.
As Alex progressed in his design journey, he encountered a few technical issues but approached them with a new mindset. He visited Corel's official support forums and YouTube channel, where he found numerous tutorials and troubleshooting guides. The community was helpful, and his issues were resolved quickly.
Alex's experience taught him the value of integrity and patience. By choosing the path of legitimacy, he not only protected himself from potential legal and security issues but also gained access to ongoing support and updates. His designs improved, and his studio began to flourish.
Years later, Alex would advise young designers facing similar dilemmas to always opt for legal software. "It's not just about avoiding risks," he'd say. "It's about being part of a community that values innovation, creativity, and integrity."
This story aims to highlight the importance of using software legally and the benefits that come with it, such as access to support, updates, and a clear conscience.
Installing CorelDRAW 2019:
CorelDRAW 2019 is a popular vector graphics editor used by professionals and hobbyists alike. To install it, you typically need to:
- Purchase a legitimate copy: Buy CorelDRAW 2019 from the official Corel website or an authorized reseller. This ensures you receive a genuine product key and support.
- Download or obtain installation media: Get the installation files from Corel or insert the installation DVD.
- Run the installer: Follow the on-screen instructions to complete the installation.
Using a cracked version:
Some websites offer cracked versions of CorelDRAW 2019, which bypass the licensing and activation process. I strongly advise against using cracked software. Here's why: Sistema operacional: Windows 10 (64 bits) ou superior
- Legality: Using cracked software is a copyright infringement and may lead to fines or penalties.
- Security risks: Cracked software often contains malware, viruses, or backdoors, which can harm your computer and data.
- Stability issues: Cracked software may not function properly, leading to crashes, data loss, or corruption.
- No support: Cracked software users typically don't receive updates, bug fixes, or technical support.
- Ethics: Using cracked software deprives the software developers of revenue, which can impact their ability to invest in research and development.
Review of the search query:
The search query "como instalar corel draw 2019 crackeado fix" suggests that you're looking for a way to install a cracked version of CorelDRAW 2019. I do not recommend attempting to install or use cracked software. Instead, consider purchasing a legitimate copy of CorelDRAW 2019 or exploring alternative vector graphics editors that offer free trials or affordable pricing.
If you're experiencing issues with installing or using CorelDRAW 2019, I can offer general troubleshooting steps or provide information on legitimate ways to obtain the software.
While searching for guides on how to install "CorelDraw 2019 crackeado fix," it's important to know that using cracked software is illegal and carries significant risks, including malware infections, identity theft, and legal penalties.
Instead of risky cracks, you can resolve installation and startup issues using official methods or consider free, legal alternatives. Troubleshooting Official CorelDRAW 2019 Installations
If you are experiencing issues with your legitimate CorelDRAW 2019 installation, try these common fixes:
Repair the Installation: You can often fix errors without a full reinstall. Go to Control Panel > Programs > Uninstall a program, find CorelDRAW, and choose Repair instead of uninstall.
Reset Workspace: Hold the F8 key while starting the application to reset the workspace to factory defaults. This can fix loading lags or crashing.
Fix Loading Issues: If the software fails to open, you can try deleting the version-specific folder in %appdata%\Corel. Deleting the "CorelDRAW 19" folder will force the program to recreate its registry settings as if it were a fresh installation.
Disable Antivirus: During installation, third-party antivirus programs sometimes block necessary files. Temporarily disabling them can resolve "Warning 1946" or other setup failures. Why Avoid Cracked Software? How to repair your CorelDRAW installation
Aqui está uma estrutura completa para um blog post otimizado sobre o CorelDRAW 2019, focando em como obter a ferramenta de forma segura e eficiente, sem os riscos de versões "crackeadas".
Como Instalar o CorelDRAW 2019: Guia Completo e Alternativas Seguras CorelDRAW Graphics Suite 2019
continua sendo uma das versões mais queridas por designers gráficos, oferecendo ferramentas robustas para ilustração vetorial e layout. Se você está procurando como instalar esta versão ou resolver problemas de ativação, este guia trará o passo a passo oficial e os motivos pelos quais evitar versões modificadas (crackeadas) é a melhor escolha para sua carreira e segurança. Requisitos de Sistema para o CorelDRAW 2019
Antes de começar, verifique se o seu PC atende aos requisitos mínimos listados no Suporte da Corel Sistema Operacional:
Windows 7, 8.1 ou Windows 10 (32 ou 64 bits) com as atualizações mais recentes. Processador: Intel Core i3/5/7 ou AMD Athlon 64. Memória RAM: Mínimo de 2 GB. Espaço em Disco: Pelo menos 2.5 GB para os arquivos da aplicação. Resolução de Tela: 1280 x 720 a 100%. Passo a Passo: Instalação Oficial
Para uma instalação limpa e sem erros (o famoso "fix"), siga o procedimento padrão recomendado pela Baixe o Instalador:
Utilize o link oficial enviado em seu recibo de compra ou acesse sua conta no portal da Corel. Execute o Setup:
Feche todos os programas abertos para evitar conflitos de memória e execute o arquivo Insira sua Serial:
Digite o número de série (serial number) fornecido no momento da compra. Instalação Típica:
Escolha a opção "Instalação Típica" para configurar automaticamente as principais ferramentas do pacote (CorelDRAW, PHOTO-PAINT, etc.). Autenticação:
Uma conexão com a internet é necessária para autenticar sua licença e receber atualizações de desempenho. Por que evitar o "Corel DRAW 2019 Crackeado"?
Embora versões "crackeadas" prometam gratuidade, o custo oculto pode ser muito alto. Especialistas de segurança como a e a própria alertam para riscos graves: System requirements - CorelDRAW Help
5. Execute o Patch (Se Necessário)
Alguns cracks requerem que você execute um patch. Esse patch geralmente vem junto com o arquivo de crack.
- Execute o arquivo de patch como administrador.
- Siga as instruções fornecidas.
BCD Editor EXAMPLES:
If you ask for help on the "/export" switch, you'll see:
C:\>bcdedit /export /?

bcdedit /export <filename>

This command exports the contents of the system store into a file.  This file
can be used later to restore the state of the system store.  This command is
only valid for the system store.

<filename>          The filename to be used as the destination for the export.
                    If the filename contains spaces, it must be enclosed in
                    quotation marks ("").

Example:

The following command exports the system store to the specified file:

bcdedit /export "C:\Data\BCD Backup" |
So we tried the following and saw it was successful:
C:\>bcdedit /export "C:\Users\<your user name>\Documents\bcdtemp.bin" The operation completed successfully. |
After examining this backup file in our Documents folder (using HxD), our first reaction was: "Man,
this thing appears to be full of all kinds of needless 'gunk'!" It even saves the path and filename to this backup file, inside the file
itself!
Then we compared it to the original BCD file by making a copy of that file while the OS was offline (connected as a slave drive to a
different OS), and found there were MANY differences! So, the 'backup copy' is not really a true copy. And the differences go well beyond simply
changing the path name of its location.
So why is this file so 'cluttered' compared to the Windows XP boot.ini file? Its first 4 bytes
are a big clue: "regf". Reason: The BCD file has the same format as a Windows Registry hive! (For example, the NTUSER.DAT
file begins with the same 4 bytes.) And in fact, once a Windows Vista/7/8 OS has actually started booting-up, it loads the BCD file into the Windows Registry
at: HKEY_LOCAL_MACHINE\BCD00000000.
BOOTMGR Experiments:
What happens if we change the NT Disk Signature on a Windows 7 disk drive?
To test this, we used a disk editor to alter the bytes at offsets 0x1B8 through 0x1BB in the MBR (first sector of the disk drive) by simply adding 1 to each byte. If you attempt to boot a PC after doing that, you'll see the following BLACK error screen:
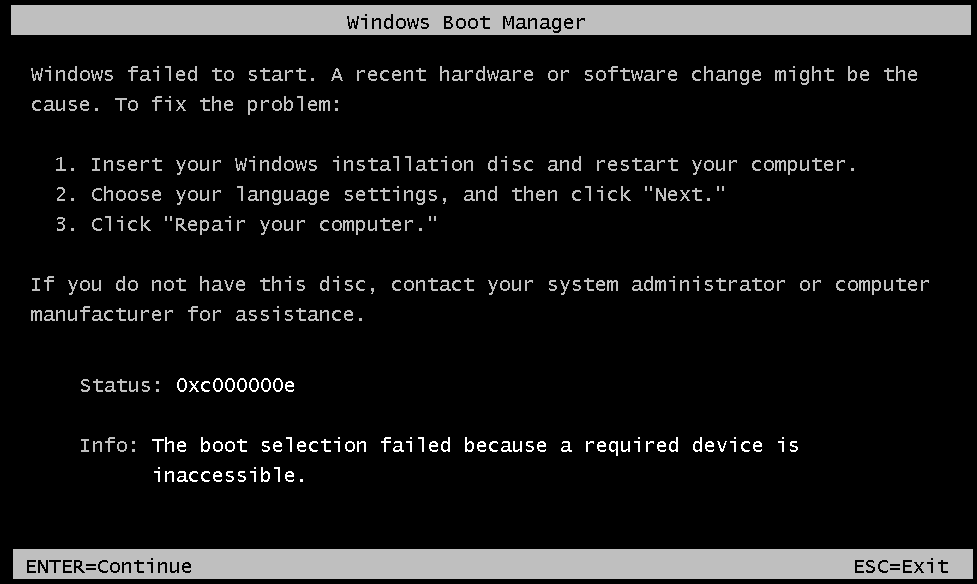
In previous Windows versions, the OS would still boot up this way; even though there was the
possibility some program that used the Disk Signature could then have problems. Note: The same error message, with Status: code of 0xc000000e,
will also be displayed if we change those NT Sig. bytes to all zeros! Only if you edit these bytes back to their original values will the PC boot-up again.
It's also possible to see such an error if your PC is somehow directed to start booting from a drive other than the normal boot drive, and the BCD
Store on that drive points to the first drive, which will obviously contain a different Disk Sig. than what is stored in that drive's BCD. Most PC BIOS have
a 'Boot Menu' (often accessible using the F12 key at boot-up) which temporarily makes whatever drive you select, be the first drive on the PC, so a
Windows 7, 8.1 or 10 OS on that drive will not have this error! (Note: Unless you plan on always keeping an original Windows OS drive
and a new Windows OS drive both connected to your PC, you should never do a new OS install with any other drives connected
to the PC!) Why? Because new Windows OS installs often make changes to a primary disk drive, even when installed to a secondary drive! Disconnect all
but the disk drive you intend to install a new Win OS on, and in the future you will be able to boot-up the new drive all by itself (or using a Boot Menu key)
without it depending upon some primary disk drive you decided to remove, or that has failed.
NOTE: The error shown above is a function of the bootmgr program! We know this, because the same error message will be displayed after
altering the NT Disk Signature on a drive that has had its entire C: Volume (where the actual Windows OS resides) removed! So, the Boot
Manager must check the NT Disk Signature before it even looks for the presence of the C: Volume.
But how does bootmgr know what those hex
bytes should be?
Answer: After examining both our copy and the original BCD file, we found the NT Disk Signature there, in the same
order as found in the MBR Sector, no less than 9 times. For our small test install of a new Windows 7 OS, this shows
where those bytes occurred (highlighted with a pink background color); along with all the other data contained in a BCD Store file.
Note: The \Boot folder of your System Reserved partition will also contain a few LOG files: BCD.LOG, BCD.LOG1 and BCD.LOG2, but the numbered files are often empty. This LOG file is a copy of the BCD file, having the same location
written inside it and all the general indications of a BCD Registry file, but about half its bytes may be different.
Have fun examining your own backup BCD copy.
Why is it so difficult to move the C: Volume under Windows 7 or later?
To clarify: Under most previous Windows installs, such as Windows 98, people who performed multi-booting or simply had many different partitions on their
PCs often used a program called Partition Magic to shrink or even completely rearrange the layout of partitions on their disk drives. But attempting
to change where the C: Volume begins under Windows 7 results in a similar BLACK screen error as above; including the same exact message: "Info: The boot selection failed because a required device is inaccessible." But with a different code: "Status: 0xc0000225."
[Note: This is true whether the correct location
is specified in the Partition Table or not; same Status code will be shown in either case. In fact, we doubt that bootmgr even looks at the
Partition Table, provided it can find the C: volume where it is supposed to be!]
This problem is similar to the one above (concerning the NT
Disk Signature), but involves the exact sector location of the C: drive's partition.
So where in the BCD file, is the sector location of the
Windows Boot Sector stored?
The reason for the question being: Although we can find our drive's NT Disk Signature in the BCD Store, we can
not find a sector location for the C: drive! Before searching, we had thought only the
BCD file would need to be updated if we moved the C: Volume. We knew how partitions are referenced in a Windows REGISTRY (see NTFS Disk Signature), but could not find any similar bytes; other than the 4 bytes of the NT Disk Sig., in our BCD file! So how
does bootmgr know where the sector offset location of a C: drive should be, and prevent booting from an OS volume we simply moved and did
not resize; even though the data in both the Partition Table and its Boot Sector (Hidden Sectors which give us sector offset to Boot Sector) have
already been updated?
NOTE: All of the following is still under construction . . . mainly because we have yet to find a solution that allows one to effectively move where a Windows 7 OS's C: drive partition begins! After using a Microsoft install DVD to REPAIR such a drive, although it did allow us to boot-up that drive and use it, the repair did not change anything permanently! After attempting to boot-up the drive again, the same error message is displayed, no matter how many times we used the DVD to 'repair' the drive!!.
Could it be as simple as the OS already having accessed the REGISTRY; with much of the system already running in Memory, it then finds the offset stored
there does not match the values in the Partition Table and/or Boot Sector, so it gives us essentially a false message, stating: "The boot selection
failed because a required device is inaccessible."? Yet, the bootmgr program could only know that if it did find and
access the Registry.
Other Experiments:
2. We next carried out the following steps on a copy of our Windows 7 OS install in order to verify our theory about why Windows 7 does this:
A) Copy the hidden file bootmgr and various folders (including "Boot\enUS" and "Boot\Fonts") from the
"System Reserved" partition to the root directory of the C:\ drive. Note: Five or six files must be 'skipped' when doing this, because the
BCD Store (and associated files) will remain in use by the OS (preventing them from being copied)!
B) Create a copy of the BCD file
in C:\Boot by using this command (as Administrator): bcdedit /export C:\Boot\BCD
C) Change the
MBR Sector, so the main OS partition is the 'Active' partition.
After that we were able to boot-up the OS from only the C: drive. In order to prove
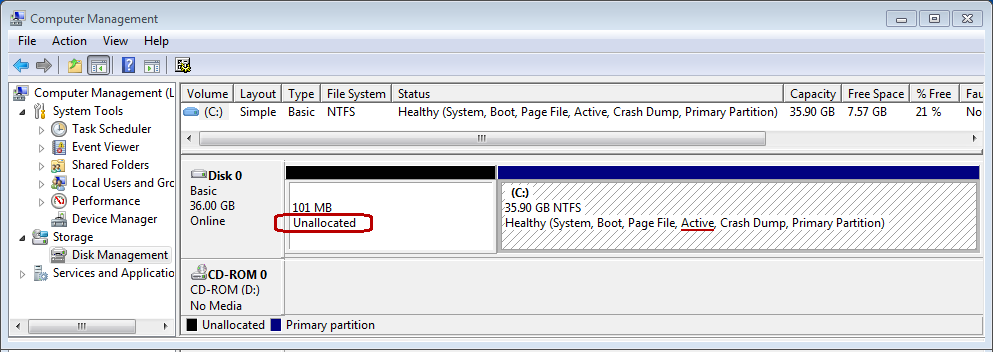
this is true, we used HxD to zero-out the entry in the Partition Table for the System Reserved partition. (Note: The reason we did not
use Windows to 'delete' the partition, is because that could have ruined being able to access it again in the future. By saving those hex bytes elsewhere
and zero-filling the entry, we can simply enter those bytes in the table again, in order to restore and access the partition!) Upon rebooting and opening
the Disk Management utility, one can graphically see this is true:
D) We shrank the size of this Volume (C:) to only 8 GB in order to run the next test below.
What about BOOTSTAT.DAT and BOOTSECT.BAK files?
E) shift the beginning of the C: drive to where the System Reserved partition had been, by correcting the data in both the
Boot Sector (VBR) and the Partition Table; not to mention, actually moving the Boot Sector and its following Volume Boot Record sectors as well